Lighting in coaches? German N scale coaches power feeders are bad. Here is an advanced DIY tip.
Bad N scale feeders
Most power feeders for N scale cars from most German/Austrian manufacturers look like that:

Fleischmann N scale power feeder
Problem with that:
- Passenger coaches become harder to pull (more resistance to movement)
- Power feeding is actually not ideal
Many manufacturers have solved the problem by a different power feeding system. Old Arnold coaches used to work with little springs. Japanese and some UK manufacturers use a much better system, where power is taken from the axis point of the wheel:

Kato N scale power feeder
Better power feeders, longer trains
We can improve the power feeding by imitating the power feeding system used by Japanese or UK manufacturers: get the power from the axis point, not by the center.
What we will need to do:
- Use metal axis points that will be inserted in the plastic of the coach bogie
- Solder those metal axis to a wire, to feed the power to the interior of the coach
- Install new, shorter axles. Unfortunately this is necessary: you cannot use the original axles again.
What is required, per coach:
- 8 metal bearing axis from the small German manufacturer Peho (some images here). 4 of them will be equipped with wires.
- For the first time, the special tools to enlarge the axis holes for the above metal bearing points. Do not try without those tools!
- Product “Bohrer-Satz”, part no 002 (see here)
- 4 new wheelsets with an axle length of 13.85mm (shorter than the original), isolated on one side only (“einseitig isoliert“). Wheel Diameter will depend on the coach and its original wheels. Fleischmann wheels for passenger coaches are usually 6.2 mm.
- Product: N-Radsatz part. no. N35 (5.6mm) or N37 (6.2mm) (see here)
- Very fine (decoder) wires or better 0.15mm copper wire
- Example: Copper wire 0.15 mm (see here)
- Some basic DIY tools (soldering iron, glue…)
Total cost per coach: about 3€. Peho tools (one time): 3.95€
Where to order
- The Peho axis points can be ordered from Peho directly. However, I recommend ordering via a “real” online shop: Modellbahn shop Sebnitz. All aforementioned Peho products are here: http://www.mbs-sebnitz.de/catalogsearch/result/?q=peho
- The wheels can be ordered from the http://www.das-service.de/modellbahn-radsatz/n/radsaetze-n/index.php shop
Both stores are only in German, but they deliver worldwide. They accept Paypal if you are not familiar with the (old-fashioned) German habit of paying with a wire transfer after invoice reception.
You can find the copper wire and other tools in your usual DIY/Electronics DIY place or for example in Conrad stores online in Europe.
Updating a coach
Step 1 – Take the bogie out. Remove the original wheels. Take out the Peho tools and metal points.

Peho N scale axle metal points & tools
Step 2 – Using the large Peho tool, enlarge the axle holes on both sides (I recommend installing the Peho points on BOTH sides of the bogie, even on the side that will not feed power). The tool has a ring that prevents you from digging too deep.
Step 3 – Using the small Peho tool, deepen the holes further in the center. Be gentle, do not go through the plastic!

Enlarged holes with the Peho tools
Step 4 – Put a bit of liquid glue (use a tissue to remove excess) in the hole and insert the metal points as deeply as possible on one side of the bogie. This side will not be feeding power.
Note: in theory, you could install power feeding points on both sides. However, the axles feeds power from one side of the track, so in this case, all 4 metal points in one bogie would feed power from the same track side.

Peho metal points with no wire
Step 5 – If you have the (expensive) Peho metal points 021 with pre-soldered wires, skip this step.
For the 011 metal points (no wire), you need to solder the copper wire to them.
Cut an appropriate length of copper wire. The copper wire has an invisible (or colored) layer of isolating matter: remove the lacker by scrapping the copper wire with a cutter (some people prefer to heat the wire with a lighter).
To solder the wire to the points, I stick the 2 points to a flat workplace with a double-sided scotch tape. Then solder the copper wire gently. Make sure the soldering point is not too big (the points still need to fit in the bogie!)

Peho metal points with wire
Step 6 – Decide how you will bring the power to the interior of the coach. I can’t help you with that, it will depend on the model and your preference. I used a decoder wire, and dug a hole through the coach floor.

Installed Peho points

Final result with Peho points and wire
Step 7 -The old wheel-sets (from Fleischmann, Minitrix…) won’t fit anymore, the axle is too long. Insert the new 13.85 mm long wheelsets. Make sure to put the isolated wheel on the right side! (see black isolation ring). If you have inserted the metal points deep enough in the bogie, the wheel-set should turn with absolutely no resistance.

Shorter N scale axles from Das-service.de
Result
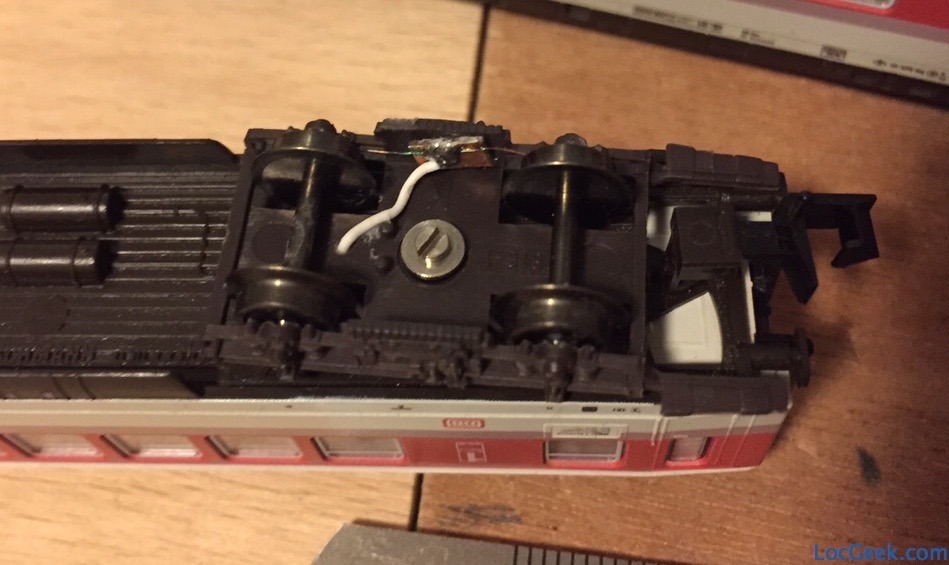
Final result (wire to the coach)
If done correctly, the coach will run totally smoothly, with power feeding at least as good as with the original feeders, if not better. In fact, with the metal bearing points, it should actually run even more smoothly than ever. You can now have longer trains with passenger coaches, pulled by one single N scale locomotive.
You could install wires on both sides of the bogie (see step 4), to even improve power feeding. In that case you have to be very careful to install the metal points as deeply as possible in the plastic despite the solder; so the wheelsets can still roam freely.
In all cases, flicker-free lighting can only be guaranteed if you use capacitors in the coach.
One last note of caution: it appears some Roco N coaches (Roco has been bought by Fleischmann since then) already use axles with 13.85 length. For Roco N coaches, replacing the wheel-sets might be useless and this DIY article may not apply (after installing the points, you may have a problem fitting the wheel-sets).
Don’t hesitate to let me know if you have found other inventive solutions, or if your supplies differ!


