A big project on a locomotive I had had for a while, with sounds of course, and even more this time.
My über-DCC plan
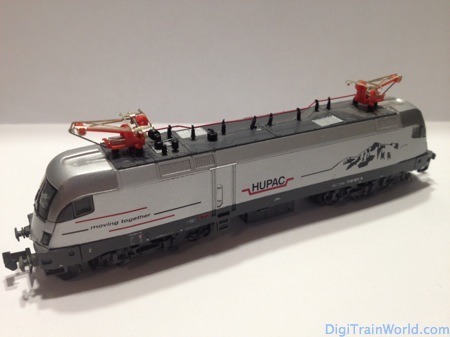
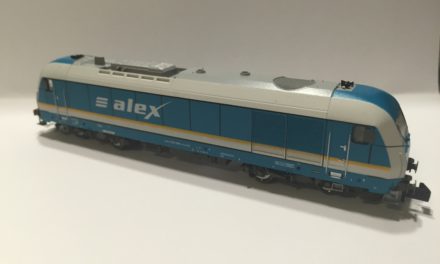
This model is a reproduction of a Eurosprinter/Taurus locomotive from Siemens, property of HUPAC (a Swiss-based freight transport company). The model was built by Hobbytrain (now property of Lemke). It was however was sold under the Conrad brand in Germany, as an entry-price model.
My initial plan was to update the decoder to an ESU Lokpilot v4.0, and to update the lighting. The model only has one white led on each side; no red lights at all.
Then I opened the locomotive, and my project became a sound install project.
And then, just because I was waiting for my ESU Loksound v4.0 decoder parcel to arrive, I decided to try even better: driver’s cab lighting. The ESU Loksound has 4 function outputs. 2 are the usual front and rear lights. I usually leave the 2 other outputs unused. This time, I would try to use the decoder to the fullest.
At stake for this DIY project: a €49 locomotive… and a €89 decoder. Model railroading can be adventurous hobby!
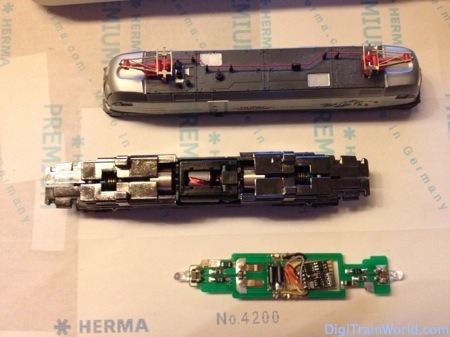
Here is the locomotive. The electronic board had no NEM 651 plug, and the 2 basic white LEDs are clearly visible. The decoder I had built in a long time ago was a simple model from CT-Elektronik.
Driver’s cab
The lighting boards had to be attached to the roof section of the engine. I was wondering how to connect them to the engine (and the decoder). Wires are easy, but with little space available, they might prevent the correct closing of the case. So I decided two things:
- The contact with the main engine body (and the decoder), would be done with contact feeders. They would create a contact when closing the locomotive. This would allow opening the engine again without any risk of tearing off wires.
- Instead of wires stuck to the roof, I would be using conductive silver paint (the same I use for my wheels).
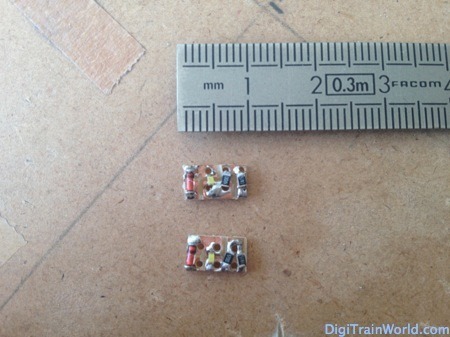
I quickly built 2 small electronic boards, with SMD components. The LEDs are (super) small white leds, quite powerful with 200mcd (Conrad part no. 180479). As only real amateurs do, I used an online calculator to compute my resistor value. I ended up using 2 resistors per board – 470Ω + 51Ω – as I had them in stock (part nos 427802 & 427578). I added an diode as an extra precaution (140902).
200mcd is way too much. I’ll have to use the dim function of the decoder for the locomotive not to light up half of my train station.
Here are my 2 driving cabin lights, with my signature dirty soldering:
Installed and glued to the roof:
With the silver painting contacts:
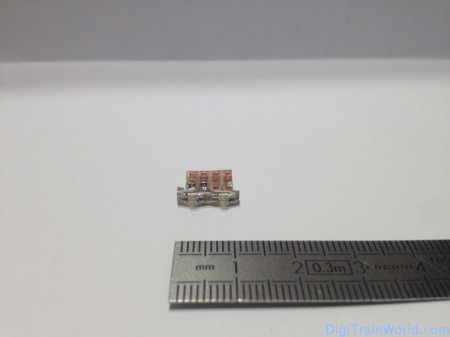
For the contact between the roof section and the engine core, I’ll use small bits of electronics test boards, as I like to do. The small board on the locomotive body side will bear 3 flexible metal parts, the same used for the contact feeders for car lighting.
So finally the full roof, with cabin piece in place (hiding the boards):

I was surprised how easy that was. The silver painting works very well (there was only one point I needed to repaint). I think I’ll try to install such driving cab lighting more often. Especially in EMUs/DMUs where room isn’t a problem.
Finding space
Decoder
So now, serious things. My usual ESU Loksound Micro v4.0 is not the smallest sound decoder around: 25.0 x 10.6 x 3.8 mm. The length is not so much of a problem, the issue is rather the height. Nearly 4 millimeters can be a lot in N-scale.
For a while, I considered trying the smallest N sound decoder around (as far as I know). The Ct-Elektronik SL-76 is only 16.7 x 7.7 x 2.3 mm… that’s a huge difference! (2024 note: Tran/Ct-Elektronik doesn’t exist anymore).
But in the end, I went for ESU. Despite good experience with CT-Elektronik products in the past, I like focusing on a single brand. Plus, I like the ESU decoder. I know how it works, I have the ESU Lokprogrammer to change the decoder sounds and configuration in a few clicks. Besides, it was hard to find any sound files for the Tran SL-76. ESU on the contrary has a lot of sound projects to download, including at least 2 for Taurus-class locomotives.
So I went for the ESU Loksound Micro v4.0, as usual. The price seems to have dropped by €20, which means you can find it for €89 (good news!).
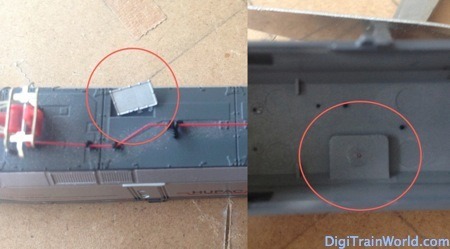
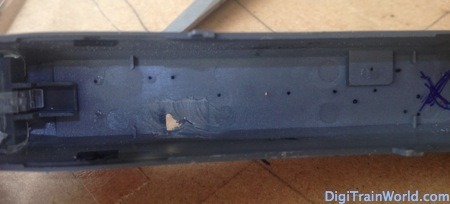
To accomodate the 4 mm thickness, I had to cut off part of the roof. A fake plastic grid was applied on the rooftop. This grid led the inside of the roof to be 1 mm lower than the rest. I removed the grid, clearing the inner part that would have come in the way of the decoder. The grid will still fit on the outside.
And here is the result. Again, I’ll learn to do things in a cleaner manner someday:
Speaker
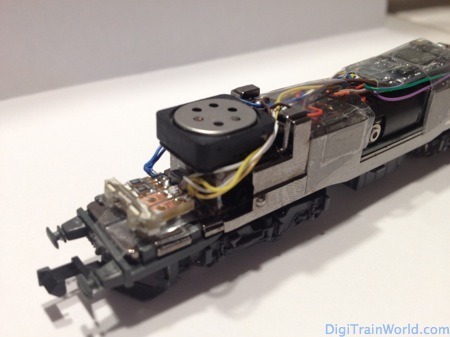
The last thing I needed to do was to make sure my loundspeaker would fit. In a similar installation described on the the German website 1zu160, it was placed under the locomotive, between the bogies. Sadly, this space in the Hobbytrain model is part of the lead core of the locomotive. It would have been a pain to cut.
There was another space that was freed by the removal of the board. The space left by the huge 3mm white LED was exactly what I needed. I wasn’t sure how to make sure I’d still hear the sound. So I made 3 small holes in the roof, right where the pantograph is attached. They will be invisible once the pantograph back in place.
Last but not least, I had decided to use a flat speaker this time. I had read in a German magazine they where better than the rectangular ones I was using until now. Specifically, they had reviewed the new 50326 from ESU. With 12x14mm (and about 5.5mm in height) it is perfect for horizontal placing in N. It is given for 8 Ohms, 1~2W.
Then, while browsing my favorite online store, I found a very similar looking speaker. The LS1412 from Doehler & Haass (a small German decoder manufacturer), had different specs: only 0.8W.
The price? About €10 for the ESU, €5 for the Doehler & Haas on Modellbahnshop-Lippe.
Look at that:
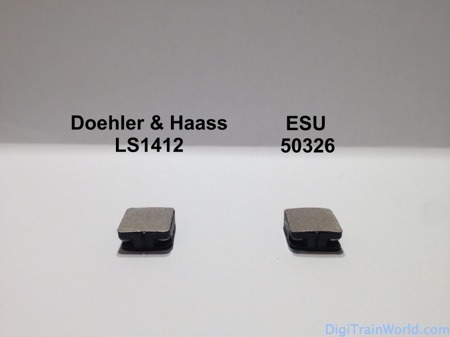
ESU is a serious brand. I had no reason to doubt their speaker was a bit more powerful. But looking at the picture, I couldn’t help but thinking this was a case of “no-name vs. brand-name product”, both coming form the same factory.
I tested them both, and seriously, I couldn’t make any difference. I must say however, that I didn’t try them side by side. I unsoldered the Doehler & Haass to test the ESU afterwards. In a nutshell, I am not ruling out that the ESU is slightly better. However, I’ll use the Doehler & Haass in the future, it’s good enough for me.
Starting the conversion
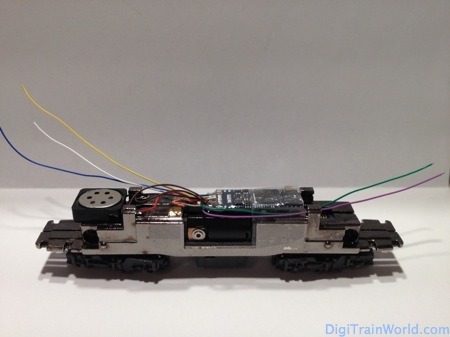
So, I installed the decoder. Soldered it to the motor pins, the speaker, and the body of the locomotive. The body is simple enough: the 2 lead parts on each side are conductive of their respective track side. It’s a solid and sturdy construction. I just need to be careful to isolate anything I’ll put on it.
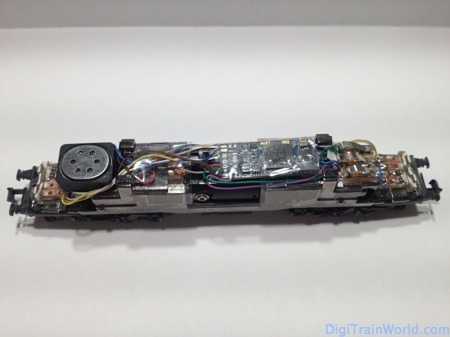
Here is a picture to illustrate all my explanations above:
One thing to note is, Doehler & Haass advise to remove the small grid on top of the speaker. It’s just a small flexible glued part you can see in the pics above. So here is the speaker part:
Stalling on LED headlights
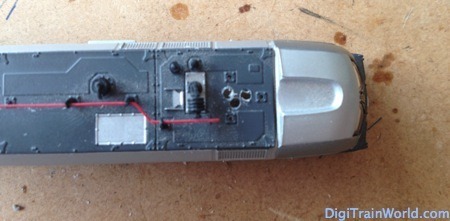
The headlight parts was supposed to be easy. 4 SMD LEDs, resistors, done. I won’t explain all my tests. Suffice it to say, it took me literally 4 evening, 8 different tries and about 16 LEDs before I could find the right combination.
My problem was the following. The interior design of the driver cabin only leaves about 2-3 mm in height to install anything, but 4 mm at the far end (near the actual transparent plastic headlights). A board is 1.5 mm high, an SMD resistor about 0.5 mm, and the LEDs about 1 mm. I let you do the math: not a lot of room.
So my final design involved 2 mini boards glued together, and also some silver paint:
Final steps
Nearly done!
I installed the part that would serve as a contact board with the roof, for the cabin lighting:
Then I prepared the the decoder and sound profile. I am now pretty comfortable with the ESU Lokprogrammer, so this part is really rather fun.
As usual, I use a pre-programmed project from the ESU website. It has the advantage of having all main sounds (motor, air compressor…) already installed; I just need to add all the extra sounds I want.
I used the Eurosprinter profile. Eurosprinter is the actual Siemens nickname of this locomotive range. I think the designation “Taurus” belongs to the ÖBB in Austria.
Another thing felt good. I was finally using all 4 outputs of the Loksound Micro (2x headlights, 2 AUX outputs for driver cabins on each side). Attributing functions to outputs was really a breeze thanks to the program. All would have been possible using CV programming, but it would have taken much longer.
I am using 31 functions out of 28 supported by the decoder. Yes, that’s correct. I just discovered a trick I hadn’t thought of. One can attribute the “shift” function to a button. It works just as the shift function on a keyboard: shift + a letter will make another letter or an accent. Same thing here. Say function 15 is an announcement for station 1, then function 15 plus function 24 (shift) can be an announcement for another station.
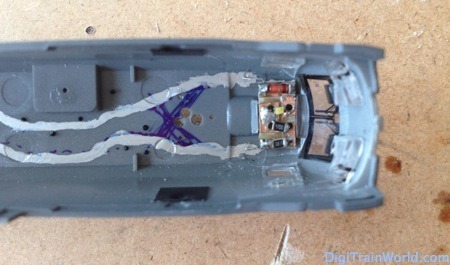
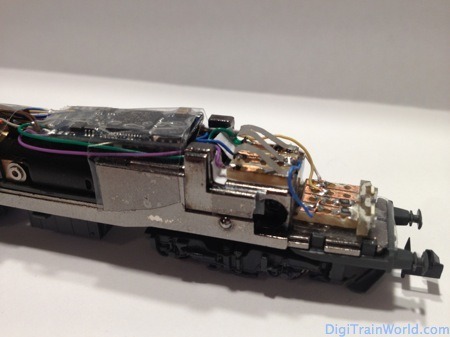
Here is the locomotive as it looked before closing the case one last time:
Conclusion
I am glad it worked. I have a full functioning sound locomotive, with 28 physical or sound functions!
This was my first sound install in a relatively reduced space. I’m not sure I will do this very often. After all, models with sounds are now much more frequent these days. Sound-equipped Taurus Locomotives from Fleischmann are now selling at less than €220. But nothing can replace the pleasure – and frustration – of a little DIY.
I am not 100% satisfied with the headlights. I had to omit the 3rd (centre/high) headlight, which you can see in this video. On the other hand, I am glad about the driver cab lighting. It’s fun, and adds another function to play with. The reality however, is that the cabin usually stays dark while the train is on its way. I guess the drivers only turn on the lights when they get on the locomotive. But anyway, I still am not a purist, I like to play.
If you need inspiration, I suggest visiting the 1zu160 page about decoder installations (in German, use Google translate). It’s an impressive list of decoder installs and visual tips, it helped me a lot.
