It’s done! Possessed by an unusual DIY motivation, I’ve added a floor to the helix…then a second, and finally a third that will be my small mountain train station.
Laying the track
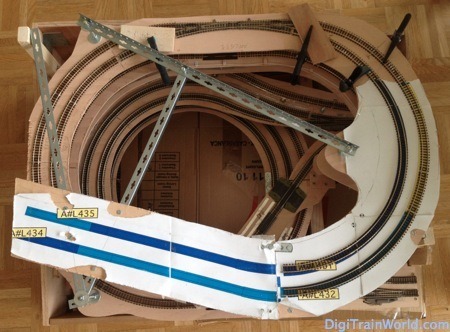
As shown in the previous post, I had started adding another loop to my helix. Shortly after, I applied the track.
I may know a lot about DCC and gadgets, but I still am a layout-builder with limited experience. I had tried many methods for fixing the tracks already. Double-side scotch tape? Not durable. Nails? A pain to pin, and too long for my 6mm wood. I had always avoided the most obvious solution (glue), to be able to reuse the track. Now is the time to trust my plans, and to condemn the track to stay here forever. The only items I don’t glue are the switches.
This is part of my track laying process on the first added floor:

Laying the track
DCC accessory decoders are expensive, but luckily, I still had just enough slots left on already-installed modules. I will need 3new outputs in total. One for this first floor, and two closer to the “mountain station” at the top.
By the way, under this module, I am using Tams Elektronik switches decoders WD-34. I have two modules (8 outputs), controlling 9 switches (2 are paired together). They are Railcom compatible, which mean they can send inform the command station on the switches status. This isn’t as useful as it sounds: the module reports the position as last ordered, but the switch doesn’t actually report to the module whether or not it correctly changed position. Such a “real feedback” system is too much hassle in N.
Moving up
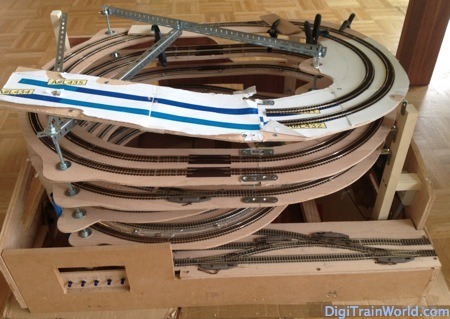
So I finally decided to finish this helix once and for all. I decided to take out the module and work on the floor. Since these modules are designed to be easily movable in the future, this took about 30 seconds. There is a single electronic connector to disconnect from the previous module (I’ll probably discuss my module connector in another post). Then only 2 screws to unscrew, and the 2 feet to remove. The tracks are not attached from a module to another. It was quite a hassle, but I managed to have them match exactly. Here is the module on the floor:
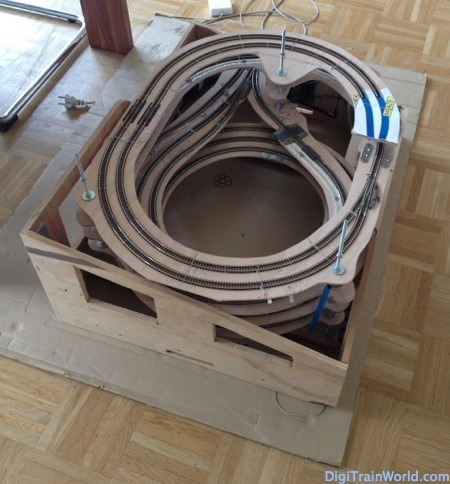
The module taken out of the layout
Now the first thing I needed to do was to repair a construction mistake. The wooden bar holding the helix (through metal sticks) wasn’t solid enough. I hadn’t planned on adding so many floors. Also, these modules are probably going to be moved more than once. I need to make sure they will hold.
Once the module placed vertically, I was able to change the 2 support bars (one after the other), without gravity taking everything away.
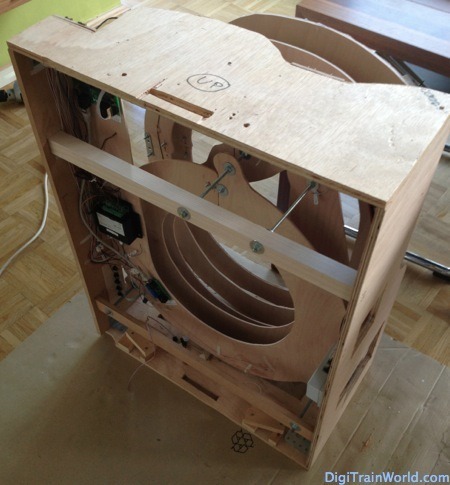
Adding support
The final floor
After adding a second extra floor, it was time to finish up. The final floor will be a visible 2-track cul-de-sac station, mostly used for short EMUs and DMUs.
The first issue I had was a track planning issue. I had two sections joining together from the loops, and wanted two tracks at the station. Given the limited space, I didn’t know what was the best track combination to adopt. The problem in N, and in curves, is not to find space, but rather to make sure the chances or derailment are close to 0.
My initial plan was to reuse a Fleischmann double slip. However, many trains wouldn’t have liked the counter curves:
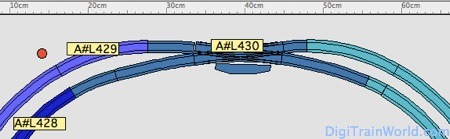
The initial solution, with a double slip
I ended up going for a more classic solution: two switches next to another. After testing, and given the reasonable curve of Fleischmann switches, it looks that I won’t have too many accidents after all:
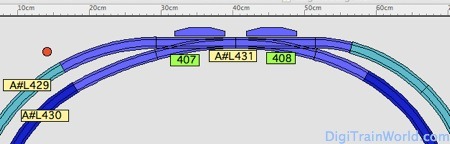
The chosen solution (2 standard switches)
The 2 switches will be under a tunnel, so I didn’t burry the electromagnetic motors (the standard ones from Fleischmann) only the last 1/2 circle and the final short straight lines of the station will be visible.
Next, I spend quite some time figuring out how to build the top area. This will need to support a plateau, with a few houses. It turns out it was a hassle to find a solution with the right supports, while still not blocking the trains going up.
The other constraint was future access. Whatever I add on the top, it will have to be easily removable in the future in case I need to access the loops. Sure, I can (barely) fit my head in the middle when coming from underneath. This will suffice for derailments or blocked trains, but for more extensive work, I need to be able to access everything from the top.
The final result looks kind of messy (and really, it is), but it is solid.
Final helix with station (top view)
Glad it’s done
I have started laying the upper most track sections on my monster helix module:
Final helix with station (side view)
In the meantime, here are a few numbers about the final result:
– 6 Levels (5 loops)
– 5 full length sections (>125cm, e.g. for TGVs)
– 4 Short sections (between 80cm & 125cm)
– Average track grade 3.4% (not prototypical at all, but ok my trains)
– Module size of 60×80 cm
I don’t have room for a big clean train yard. Train capacity was my goal, and I am happy with the result. I have 9 sections, which means up to 9 hidden trains on quite a small footprint.
There is still a lot to be done. The most challenging part will be to find an elegant yet removable way to decorate all this. This includes the top “village” and station, already mentioned, but also the sides… which will have to be pretty steep mountain sides.


Good job! Helix are very difficult to plan and develop, it’s like an engineering Project in N scale! I’ll have also one helix in my layout, and was very difficult to plan it with WinTrack software…
Thanks, I saw your post at http://www.rintiland.es/2011/12/cambios-en-el-diseno-de-rintiland-2.html This is an impressive ramp, and you’ve done your planning homework much better than me (sometimes, I improvise a bit too much).
Good luck for yours!